It is spring break here (I work at a University) and while I don't have the week off, I decided to take a small spring break and so took the afternoon off. The weather was nice--it was partly cloudy and in the low to mid 60s. So after a quick drive through Finley National Wildlife Refuge to get a last good look at the Dusky Canadian Geese before they finally pack up and head back North, I stopped by the body shop to check on the progress of my car and to let them know my final color selection. They were working on the car--making sure the panel gaps were perfect--so I snapped a couple of pics.
Above is the front edge of the driver's door. Unhappy with the gap, they added a thin sliver of metal and had just finished welding it in place. I have to admit that their welds are much nicer than mine, and I'm very pleased with the door gap now. I hadn't said anything, but that gap had been bothering me. These folks do good work.
The last time I saw the car the hood and the passenger door were off and they were working on the edges--again making sure the shut lines (the gaps between the panels) were even. It doesn't look that way in the pic above--but that's just the different colors throwing things off.
The plan remains the same: They will finish up the work on the shut lines and then get it in for another coat of primer. Then they'll block sand it (multiple times) and paint the jambs--the door openings and the inner fenders and firewall. At that point, they'll take off the dog house (the front fenders/hood assembly) and deliver it to my house. I'll install the front suspension I just rebuilt, install the engine and transmission, and return it to them. They'll then reassemble the dog house and paint it.
Looks like I'll be very busy in the near future.
Wednesday, March 27, 2013
Sunday, March 24, 2013
Sunday, March 3, 2013
Quick update
It has been a busy week at work so not much time on the Studebaker. I did manage to get the control arm assembly from the other side torn down and cleaned up, so made a little progress.
In the good news department, the body shop called me to let me know that they're back to work on my car. I'll try to stop by and check in on it later in the week.
Sunday, February 24, 2013
Control Arms
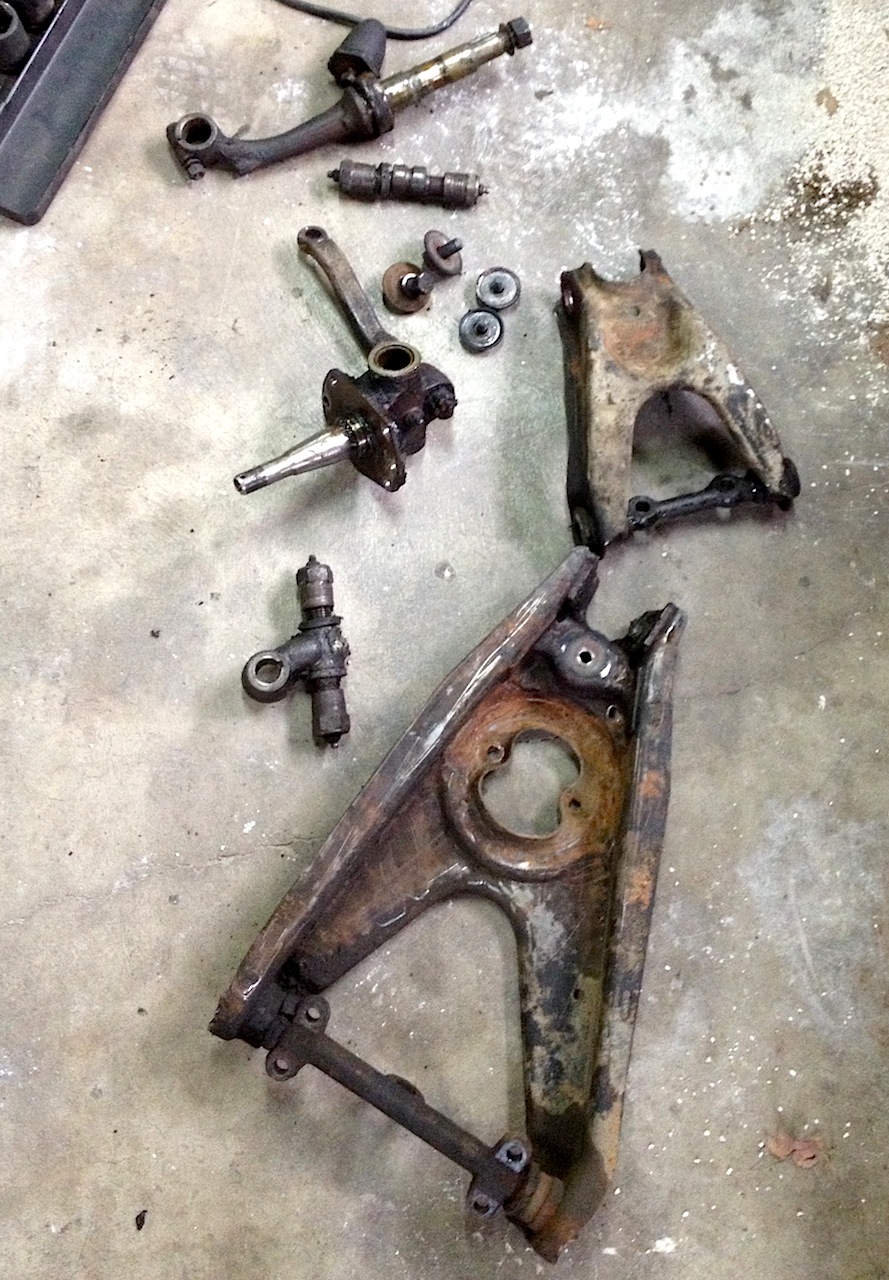
After adding a cheap press to my shop, I was finally able to complete the dis-assembly of the control arms from one side of the car. First, using borrowed-home-made special tools to prevent the 20-ton press from distorting the shape of the control arm, I pressed down on the inner shaft and pressed the bushing until it was flush with the edge of the control arm:
After getting it that far, a dull chisel and a hammer (ok, I cheated and used an air chisel) is used to drive the bushing the rest of the way out of the control arm.
Here's the upper control arm stripped to the bare shell:
Then comes the inevitable cleanup:
After cleaning off all the caked on grease and road grime, I hit the parts with a wire brush and put on a coat of primer and paint. Sorry, I'm a little rusty at the blogging thing and I forgot to take a pic of that. Yup, nothing makes exciting blogging like pictures of paint drying!
Then it was simply a matter of putting things back together. I started with the inner bushings on the lower control arm. Here's the upper control arm with more of those home-made tools (in case you were wondering, the factory specified special tools are no longer available for this.)
Attaching the outer bushings and the kingpin is a bit trickier. It requires a special tool (which I actually own!) and some very careful measurement. To keep the end of the arm from binding the outer pin, you have to spread the arm 0.015 inches. So out comes the micrometer and tool--and since I had to pay really close attention, I didn't take a picture of this procedure.
I stopped for the day because I need to push a bushing and a bearing into the steering knuckle (which holds the bottom, shiny portion of the king pin you see in the above picture) and didn't have the correct tools for the job. Time to make a few calls--there has to be a Studebaker person around in the area who has done this previously.
And once that is done, it will be time to move on to the other side and do this all over again. Next side should go much easier, now that I have an idea of how to go about things.
They've only been in there for 50 years... |
Here's the upper control arm stripped to the bare shell:
Needs a bath! |
No heavy solvent--just some green cleaner and a lot of scrubbing |
Then it was simply a matter of putting things back together. I started with the inner bushings on the lower control arm. Here's the upper control arm with more of those home-made tools (in case you were wondering, the factory specified special tools are no longer available for this.)
Pressin'! The rusty area is simply dust off of the tool. |
Here's the completed upper arm. |
I stopped for the day because I need to push a bushing and a bearing into the steering knuckle (which holds the bottom, shiny portion of the king pin you see in the above picture) and didn't have the correct tools for the job. Time to make a few calls--there has to be a Studebaker person around in the area who has done this previously.
And once that is done, it will be time to move on to the other side and do this all over again. Next side should go much easier, now that I have an idea of how to go about things.
Sunday, February 10, 2013
Suspension dis-assembly
I finally got some time to work on Studebaker stuff today and so decided to tackle the clean-up and dis-assembly of one side of the front suspension.
First, removal of about 8,000 lbs (only a slight exaggeration) of hardened grease and grime.
Then it was time to break out the air tools. Turning the piece upside down, I removed the castellated nut that holds the king pin to the lower support and steering knuckle.
After the nut is removed, the king pin is driven out of the lower support using a hammer and a brass drift. You gotta love a job when you get to use a hammer! Unfortunately, this step was also supposed to be done with the upper control arm still in place on the car. So after a bit of pondering, I decided a jack stand might just do the trick.
Then it was simply a matter of getting after the bolts on the side of the assembly. These were really on there, requiring that I break out the 3/4-inch impact hammer. The larger tool made short work of things (I didn't even think about taking a picture using it) and soon I was left with even more pieces.
There are still a couple of parts on there--the long, inner shafts on the control arms require that the bushings holding them in place be pushed out with a press (which I don't have) and there's a keeper in the lower support that needs a press as well. But this is far enough along to enable me to order parts. Fortunately, it is in very good shape, so I'll just refresh the bushings, bearings and seals.
And even though I have the Shop Manual, I'm going to leave the other side together for reference. You just never know.
First, removal of about 8,000 lbs (only a slight exaggeration) of hardened grease and grime.
This clean up was just to find all the nuts and bolts. I'll make it pretty later, after a long soak. |
Of course it's blurry--you try holding a camera phone steady when operating an impact hammer. |
More pieces! |
Done for the day. |
And even though I have the Shop Manual, I'm going to leave the other side together for reference. You just never know.
Monday, February 4, 2013
Saturday, February 2, 2013
Now for some not-so-shiney parts
A pair of '64 Studebaker control arms and king pins (and a steering box to play with) |
Now I have something to do--as well as having a full morning with a couple of us pulling them off of the donor car. Although it was cold and foggy out, it was good to work on a Studebaker again.
It'll start with some clean-up and dis-assembly. More to come soon.
Monday, January 21, 2013
Patience
Sorry for the lack of posts lately--but there hasn't been much going on in Studebaker-land. Since I didn't have to work today, I decided to check in on the Studebaker at the body shop. Unfortunately, there's been no work done since my last post on the subject.
I knew going in that insurance jobs came first. And, unfortunately, a bit of icy weather a couple of weeks ago, which is rare in this part of the world, ended up creating a lot of work for them--they're just now getting caught up from that. The good news is that they've been so busy that they're hiring another person. So here's hoping they finally get it into paint soon. The only thing left before paint was they need install the trunk latch and make sure everything is aligned.
And the last couple of weeks I've been busy preparing my "old" hobby car for a new owner--there were just a few little things that needed tweaking to get it ready for a road trip. Well, that's done now--the new owner, Chris, picked it up yesterday. That frees up a bit more of my weekend time.
So what to do?
Well, I was thinking that the first thing I need to do when I get the Studebaker back from the body shop is to rebuild the front suspension. Why not get a jump on it by picking up another setup? A quick call over to Studebaker John (a local Studebaker vendor, not the blues artist) and I've reserved the control arms and king pins from the 64 GT Hawk that my engine and twin-traction third member came out of. So as soon as it warms up a bit (we're seeing highs in the 30s here, not warm enough for either of us) I'll swing over to John's place to pick those up. Fingers crossed that will be next Saturday.
There's a slight advantage to the setup as well--the kingpins on the 64 allow a tiny bit more caster than the ones on my 53. This will make it go down the highway a little bit nicer.
Guess I'll go out and sweep the garage floor. That sounds exciting.
Friday, January 4, 2013
Tuesday, December 18, 2012
Flywheel
Just picked up my flywheel at the machine shop:
Starting to think about throwing this car back together soon.
Subscribe to:
Posts (Atom)