Saturday, April 30, 2011

Sunnin'

Finally--a nice, sunny day.
I now have brakes, wheels and tires on all four corners. The brakes don't work, mind you--I still need to replace all the hard lines and the master cylinder, put some fluid in it and bleed the air from the lines,  but I wanted to get it out of the garage so I could sweep off all the crap that I'd scraped off doing the work on it so far.

I also wanted to fire her up and let her get to operating temperature again since it had been a few weeks--so she's sitting on the flat part of the driveway with the wheels chocked idling away in neutral while I clean out the garage.

Thursday, April 28, 2011

A good day in Stude-land

I took the day off from work today so I could run errands--our everyday car, a Honda Fit, had a recall for a potentially faulty headlight switch, and the little wrench on the dash lit up telling me it needed an oil change and I wanted to return the wheels on a day when the salvage yard wouldn't be busy. So after dropping off the car (and discovering it needed a 30,000 mile service to the tune of $320) I headed back to the Pick-A-Part in Albany to see if I could have any better luck finding some wheels that fit.

But first, I need to back up a couple of days--my buddy Jon, who happened to have a Ford Ranger pickup, loaned me his spare to see if it was any different from the Ford Ranger wheels that didn't fit. Lo and behold, his wheel fit--it was 1/2-inch thinner in width, but the biggest different was the back spacing. Jon's spare had a 3.75" back space, where the 1988 Ford Ranger wheels I had before had a 5" back space. So I now had some measurements of a wheel that worked. Now back to the Pick-A-Part. . .

I was loaded with information this time: I had my printed list of wheels that might fit, the knowledge I gained from borrowing Jon's spare and a straight edge and tape measure to measure that critical distance between the back of the bolting circle and the inner edge of the wheel rim.

The folks at the Pick-A-Part were extremely helpful, going through my list of cars until we had a hit--a recent addition to their lot: A 1988 Mercury Grand Marquis. The wheels were still on the car (in fact, so were the hubcaps, which required a special tool to remove. Fortunately, this was in the glove box still) and, with the able assistance of one of their staff, we soon had the wheels off and measured--a hair over a 4" back space. I'm thinking these should fit. They even pulled the rotten old tires off for me, then steam cleaned the rims.

I return home with my goodies in my old Ford pickup, bolt up a rim and give it a test spin. Plenty of clearance. I then grab the side of the wheel and twist it to turn the steering lock-to-lock--no interference from any of the suspension components. A quick trip down to the tire store, and the tires from my old rims are now on the new ones.

one quest now complete
Now we're (the car and me--she gets as much out of this as I do, I think)  moving in the right direction, ready to tackle the next problem that arises. Up next: finish up the brake work.

Saturday, April 23, 2011

It has to fit--they said so on the internet!

Today's work on the Studebaker was more of a quest--a search for wheels. You'll recall from reading about my disk brake installation that the old wheels don't quite fit. So after much research, largely on sites that I trust for this sort of information (I won't name names here) I went forth to find a set of wheels.

I live about a half mile from the local salvage yard (which is a bit on the pricey side, being the only game in town, and largely filled with newer cars of the metric variety, but it is at least a starting place) so this morning I headed there, with handy list in hand of wheels that I trusted would fit. After seeing me pull the list out of my hip pocket, the man behind the counter told me to roam about the yard and see if I could find any.

I was incredibly methodical during my search--but unfortunately was thwarted by things beyond my control--namely the price of scrap metal, which resulted in a lot of blank areas in the lot and semi-trailers full of crushed cars strapped down and out of reach. I had one moment of excitement, where I thought I had found three wheels from a mid-80's Ford Ranger, but upon closer inspection I realized they were 14-inch wheels--I needed 15-inch.

I soon picked over every square, uh, meter, of that yard to no avail--I found 15 inch wheels at random, but with no identifying marks on them to determine if they would fit. After an hour and a half, I admitted defeat and headed home.

A search of craigslist found an incredible thing--a set of four aluminum Centerline wheels in the right lug spacing that were only 5.5-inches wide. Perfect! I call, arrange a visit and discover (after meeting a very nice dog of unknown breed) that they were, indeed 9-inches wide.

Back at home, I start looking for other salvage yards within a quick drive--and discovered the Pick-A-Part over in Albany--a 20 minute drive. I give them a call and find they have a set of 4, 1988 Ford Ranger rims. I head over,  compare the number on my little Internet cheat sheet with the number embossed on the rim, and Eureka! My search has ended.
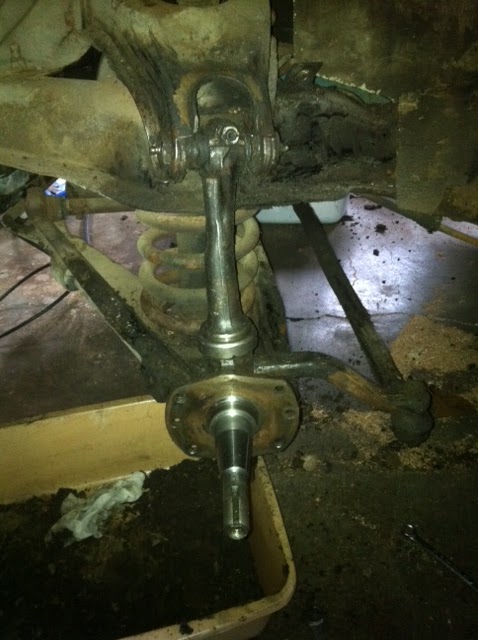
They fit, but. . .

I get home and put one on--it barely touches the top of the king pin! Argh!

So I ponder a bit--it is too late to return them and it is a very nice day and my dogs need a walk--so I go for a hike in the woods instead.

Then, while eating dinner, I thought--it is really close, how about a spacer? I jump in the car, head to the parts store, and grab a pair off the shelf--they're a bit thicker than I'd feel comfortable using in the long run, but for only $12 it is worth seeing if I could get it to clear.

Nope. The wheel spins freely until it hits a balance weight, then stops.  The offset--the distance from the hub mounting to the center line of the wheel--is too positive. It needs to be at or close to the center.
Now I could buy a set of machined hub extenders to counter that offset, but the cost would not be worth it.

I'll be headed back to the Pick-A-Part soon to, hopefully, exchange my wheels for something that fits.

Thursday, April 21, 2011

Paint color survey results

Here's the result of the survey:

Original colors (Maui Blue over Ivory Mist): 0 votes
Original colors flipped (Ivory Mist over Maui Blue): 6 votes
Velvet Black with Red Interior: 2 vote
Ivory Mist over Chippewa Green: 1 vote
Other original color: 3 votes
Other non-original color: 0 votes

Suggestions for other original colors include:
2 votes for Coral Red over Ivory Mist
1 vote for either Tahoe Green or Coral Red (hey, how 'bout combining the two? My Studebaker could put the X in Xmas!)

No promises. When I first thought about colors, long before owning a Studebaker, I would've went with Ivory Mist over Chippewa Green. At the moment, I'm torn between two different schemes--the Velvet Black with a Red Interior and the most popular Ivory Mist over Maui Blue. You'll just have to wait and see.

Wednesday, April 20, 2011

High Performance Studebakering

In my last post, I mentioned the possibility of getting a set of American Racing Mags to put on my car since the original wheels no longer fit. This led to a comment from my good buddy Jon about how my car, although beautiful, was my "grandfather's middle-age crisis car" and that AR Mags belonged on cars such as a GTO.

Such a comment demands a response.

Although my car came with a simple 6 cylinder, a 120-hp, 232 cubic inch overhead valve V-8 was available. But for a little extra kick in the pants, Bill Frick, a New York car dealer, offered the 53 with a 210 horsepower Cadillac engine. The car, known as a Studillac, was available for $1,500 over dealer invoice. Better brakes and a one-piece drive shaft were welcome additions, and the car car was no slouch, with 0-60 in 8.5 seconds and a top speed of 120mph.

And, after a slight cosmetic remodel (with the additional of fiberglass fins and a new hood and grill), the 53 Studebaker coupes turned into the Hawk. The top of the line '56 Golden Hawk had a Packard 352 cubic inch V-8 (Studebaker and Packard had merged that year) with a top speed of 130mph and 0-60 times of about 8 seconds. That's pretty good performance for 1956. The Packard V-8 was a heavy lump of an engine (725 lbs) so the next year it was swapped out with a supercharged Studebaker 289 cubic inch V-8, yielding the same performance as the larger engine but with considerable weight savings. 

Not your Grandfather's mid-life crisis supercharged engine!
But it wasn't just the Studebaker factory producing hot rods based off of that sleek old coupe body. Hot rodders recognized the streamlined body as a true racer, and off to the Bonneville Salt Flats it went--and still races at speeds well in excess of 200mph. I quote from Bridges' Studebaker's Finest:

"Over the entire history of the Bonneville Speed Trials, no other car body has accumulated as many records in production car classes as the '53-54 Studebaker coupe. (Not even close.)"


Read all about this Studebaker here.
 Hmm, Jon. I'm thinking maybe the GTO better think about if it is the one worthy of wearing those AR shoes.

Sunday, April 17, 2011

Sunday: Not the best day for brakes

The right side is done.

Done.
First thing--see that little brownish-colored line near the top of the caliper (that's the piece that looks like a clamp around the top of disk)? That's where the inside of my wheel rubs. I was expecting this--I thought the wheels were the originals, which I knew wouldn't fit over the disk brakes, but thought I'd take a chance that they'd been updated with something a bit more modern over the years. I have lots of options for wheels here--early 90's ford ranger, late 80's Crown Vic, 74 Dodge pick-up, late 70's Dodge cop cars. . .lots of choices for steel replacement wheels. . .

Of course, I could buy some nice aftermarket wheels. Some classic American Racing (AR) mags?

That's not the worst thing that happened today, of course. The bracket for the left side doesn't quite fit--back in the day when they were building Studebakers they didn't have computer controlled milling machines, so minor variances weren't unusual. So I'll have to do some minor modifications to make the part fit. Should be as simple as enlarging one of the 4 holes that are used in the spindle flange and grinding/filing away a little bit of relief at the top of one of the brackets.

Saturday, April 16, 2011

Saturday. A nice day for front brakes.

Making a little progress. Since the Turner disc brake conversion is well documented elsewhere on the net, I'll refrain from doing the step by step photos. But here's a nice little pic of where I'm at with things:

oooh! Shiny!
This morning I went to a local Studebaker Drivers' Club get together in nearby Albany, OR. Got to meet a bunch of great folks with some really nice Studebakers.

My father-in-law called tonight for an update, and jokingly reminded me that I'm not getting any younger and that I should probably get a move on with this thing and get it done. Apparently, my progress is not nearly fast enough for him.

But I do have a short term goal:


The body work might be incomplete and the interior might still be the same worn out stuff that is in it now, but I want to have it mechanically ready to roll for a nice drive come September.

It is good to have goals.

Wednesday, April 13, 2011

What color should I paint the Stude?

So many colors, such a crappy picture!

If you're not sure of what the color combinations are--and please don't trust the reproduction above, check out this modeler's site with pics of actual cars in several combinations. Or you can do a google image search, like this one.

Things to consider:
  1. Most people consider lighter colors to be more effective for the design.
  2. I've always wanted a black car with red interior.
  3. I also like 50's color combinations like Ivory Mist over Chippewa Green or over Maui Blue.
  4. I'm going to "hot-rod" the original flat-head six with some old-time performance parts, so maybe a stock color isn't appropriate after all.
  5. Dark colors require perfect body work.
Suggestions for upholstery colors would be welcome as well. Vote to your right, comment below!

Sunday, April 10, 2011

Ok, I'm tired of cleaning.

Driver's side ready to go. Remember this is a driver, not a beauty queen. But it looks like I'll be back under here soon enough--replacing some of the old rubber bushings, which look a little dry. First things first though.

Thanks to Mare for loaning me her fancy phone with the flash!

The important bits are nice and clean--and I can now find all the grease zerks.

Saturday, April 9, 2011

Saturday. A nice day for rear brakes.

Pulled off the remains of the rear brakes. Here it is down to those lovely tapered axles:


Time to clean up the backing plates--they were a mess. Here's what I took off that side:

That gunk is about an inch deep!
That's how I spent the majority of the day--cleaning up stuff. Installing the rear brakes was probably about an hour a side (I took my sweet time, and found that I really missed my nice set of drum brake tools that disappeared quite a few years ago.)

She cleaned up nicely. I fought the temptation to paint it--it has a nice patina to it and, well, this is going to be a driver, not a show car/trailer queen. So it'll soon be covered in grease and road grime again.

This is the "back" side.


Time to start putting it back together. Here's the front side of the backing plate in place.


 Next up, the rear axle seal. That's a felt washer inside that housing.


And here's the brakes starting to come together:


There's the completed assembly, right before I installed the drum. Now you'll note that there's an empty hole right about in the middle of front brake shoe--that's for a self adjusting mechanism that this car is supposed to be equipped with but the parts for it weren't there--it is missing on all 4 wheels.

Here's a pic--sorry for the low quality:

Numbers 8 & 9 are the missing bits
The car will operate just fine without these--and apparently did for a number of years--but will require manual adjustment of the brakes every so often. While this is simple enough, I'll probably try to source these eventually.

And here's the finished product:

I really need to polish those hubcaps
Tomorrow morning I'll adjust the passenger side (it is dragging quite a bit) then remove all the brake stuff from the front of the car. At least that's the plan for now--you never know, I might get stuck in my chair after hunkering down over those backing plates for a few hours.

Thursday, April 7, 2011

Looks like a busy weekend ahead?

I've had a good mail week so far. First, I got more heater bits--with a little clean up (and refresh of the electric motors and cables) I have everything but one dash switch for the Climatizer (heater/defroster) assembly.
Even more parts!


I also received the front disc brake and dual master cylinder kits from Turner Brake.

Now that should stop things a bit quicker
I love seeing quality engineered parts, and those mounting brackets are first rate.


Again, my apologies for the lack of pictures the last few days. Hopefully, this will make up for things a bit. If I do get a chance to work on the car this weekend, I'll be sure to keep a photo log of my progress.

Tuesday, April 5, 2011

Now wait just one damn minute.

I was reading through the specifications chapter in John Bridges' Studebaker's Finest when I discovered something--according to my body serial number (and my engine number) my car WAS built at the Los Angeles plant.

My body serial number falls within the Los Angeles range that starts with G-917,701 and ends at G-927,400. My engine serial number is also a US plant serial number.

I'll run this past the guru's on the Studebaker Driver's Club forums, but I'm wondering if the records at the Studebaker National Museum have lapses with the Los Angeles cars as well as the Canadian models?

Update: the folks on the forum agree with me that it is a Los Angeles car, and have double-checked the serial number range with another source. I've been encouraged to contact the Studebaker National Museum again as they should have complete records from that period for the Los Angeles plant.

Friday, April 1, 2011

Canada, eh? (or Total, abject failure)

A couple of years ago, I decided that I needed an old Pickup truck, and that further, in a sense of national and civic pride, that I should get a piece of old--but not too old-- all-American Iron (or "arn" as they say in the old woodworking machine forum.) Lo and behold, I find a mid-80's ford long bed; a stripped-down model with a huge straight 6, 4-spd with Granny gear and nothing but a heater.

"This is a manly truck," I say to myself as I kick the tires and watch the oil leaking from the valve covers.

Lo and behold I discover a year later, when looking for the correct tire size on the door sticker, a little maple leaf. OMG, this thing was built in Canada. I had somehow managed to buy an import.

My luck continues.

I get a call from the Studebaker National Museum, where the nice people in their archives have been searching for the build sheet for my car. You can see where this is going. . .

Studebaker had 3 automobile manufacturing plants: South Bend, Indiana (their home), Los Angeles California (where I was just sure my car had been built) and Hamilton, Ontario, Canada.

My "ultimate American car" is one of 1,244 Canadian-built Champion Deluxe models in 1953.

I can only guess when, and with what options since the Museum's Canadian records are incomplete and, unfortunately, my car wasn't included in those records.

Ok, maybe saying this is total, abject failure is a carrying it a bit far. In revenge, I think I'll rod this thing and, instead of ghost flames I'll do ghost maple leaves. And to think, I was pissed off at my maple tree yesterday for being so damn messy. These things have a way of coming back to haunt you.

[to be honest, the only true disappointment I feel is that I won't be able to get the build sheet]