Saturday, March 31, 2012

Trunk Corner Repair, Part 1

You'll recall I mentioned that I was going to go ahead an replace the right rear corner of my trunk since I found a few rust holes there. I started on that project today.


Even though there were a few small rust holes, that rust around the edge of that corner brace bothered me. Plus I knew that this was one of the areas where Studebaker coupes were rust prone. So after cleaning up the top, I moved to the bottom and striped off the undercoating.

A little worse than just a few small holes!
That's no good.

I'm glad I decided to fix it after all. It is, by far the worst rust I'd found on this car. So on to removing all that rusty crud.

Blue marks the spot! (Plenty of solid fringe around the edge of that rust)
Then, after drilling out the spot welds, a few minutes with a cut off wheel.

I feel better already.
There's still a bit of cleanup to do in the areas under the corner brace.


The side (on the left near the middle) appears to be just a good coating of surface rust so just needs cleaned up, but the back (the area running diagonally from the middle of the picture to the right bottom) has some rust through areas. I'll cut those areas out and weld in new metal.

That's enough for the day--off to walk the dogs before the rain starts again.

Friday, March 30, 2012

"Those Studebakers sure were ahead of their time," he said.

I was having a conversation with a co-worker while waiting for a cup of coffee on break, and he asked about my car. During this conversation, he mentioned that Studebakers were ahead of their time. Of course, he was referring to their styling--which is true and which had a huge impact on cars of the following decade.

But Studebaker wasn't just ahead of their time as rolling artforms. Here's a list of just a few of their engineering and safety firsts:

  • In 1919 they were the first to use pressed steel throughout their construction.
  • In 1921 they were the first to develop (and patent) molybdenum steel and to produce a car using it.
  • In 1927 they were the first to use a mechanical fuel pump.
  • In 1930 they were the first to use free-wheeling (this was a huge step forward in driveability.) That year also saw them introduce automatic vacuum spark advance control (improved fuel economy.)
  • In 1935 they were the first to use planar wheel suspension
  • In 1936 they were the first to use an automatic hill holder.
  • In 1937 they were the first to use a variable ratio steering gear and direct acting shock absorber. They also started using double wall pickup bodies on trucks (another first.)
  • In 1946 they were the first to introduce postwar styling. They also threw in self-adjusting brakes (another first.)
  • In 1953 they were the first to use a high efficiency paper air filter.
  • In 1954 they were the first to use self-centering, self-energizing brakes.
  • In 1955 they developed interlocking safety door latches (which means I need to check my door latches!)
  • In 1956 they were the first passenger car to use acoustical sound deadening-headlining.
  • In 1961 they were the first to have instrument panel safety padding standard on all passenger car models.
  • In 1962 they were the first U.S. auto manufacturer to offer caliper type disc brakes on a full sized car, the first to install seat belt mountings for four belts in every car, first to introduce a built in roll bar, adn the first to make transistorized ignition standard equipment.
  • In 1963 they were the first to install seat belts in the front seat of every car in its line. They were also the first to introduce a sliding roof station wagon.

Saturday, March 24, 2012

It's a Tank!

Gas tank that is.

I have finished with the welding on the interior of the car, and am moving to the trunk. It is somewhat common to have rust in the corners on the trunk--and I have a very small amount around one of the places where it bolts to the frame at the very back. While the body man who looked at my car wasn't terribly worried about it, I've decided to go ahead and weld in clean, fresh metal.

Safety first, however. I need to get the gas tank out of the way.

Today was a beautiful day, so after a trip to the salvage yard this morning to get a tail light and a rear view mirror for my poor old truck, I spent the morning pulling the metal at the rear of the bed into rough enough shape to be able to put the tail light in place. Of course, I didn't make it look pretty--that would just be time away from working on the Studebaker!

This afternoon was nice and warm, so I rolled the Stude out of the garage and put the rear end on jack stands so I could fit my 5-gallon gas can underneath and drain out the gas. My lawn mower will be happy.

To think, just 2 days ago there was about 8 inches of snow on my drive. . .
 After disconnecting the fuel line, and the filler neck (there's a hose that clamps on like a radiator hose), it was simply a matter of resting the tank on another jack stand and unbolting 4 bolts (3 on the left, one on the right--which has a spring: you can see it  in the picture above) and then lowering it to the ground.

There was a small surprise--the top of my gas tank used to be someone's home:

Fortunately, the occupants were long gone.

The tank looks very good inside--but the cork float was saturated in gas which could explain why the fuel gauge always read empty. I'll probably still have it boiled out and then coat it with a sealant just to be safe. It is easy enough to do and cheap insurance to make sure my carburetor stays clean.

Sunday, March 18, 2012

A St. Patty's Day Surprise

It started out as a nice weekend.

First, I went a few miles north to Independence, Oregon to help a fellow Studebaker driver (Ed) work on the front suspension of his 1963 R2 GT Hawk. For those who aren't familiar with Studebakers, the R2 denotes the supercharged engine. Ed's GT is a beautiful car, and looks to be a wonderful driver. He's going through the front suspension making sure everything is ready for the summer season. On Saturday he was getting everything disassembled so he could replace the kingpin bearings. Since I'd never done anything with a Studebaker front suspension (and will soon be) I asked Ed if I could come up and watch--and assist if he could use the help.

There wasn't much need for assistance--but I did get to see how to take the king pin apart. Always good to know.

I headed back and that afternoon I got everything cleaned up and ready for the final patch in the interior of the car. And this afternoon, I got half of that patch spot welded into place--like the driver's side, I discovered that I needed to split the patch in two in order to get it to line up properly. I'll post some pics soon.

Unfortunately, I was unable to work on the car this morning as planned. Last night (at around 1 a.m.)  someone hit and run my old pickup--too much St. Patty's cheer I suppose. Now my old pickup is just that--a very solid mechanically, but pretty ugly mid-80's Ford F150 that I purchased as a work truck. So I'm not terribly upset. But by the time the police report was filled out and all the broken glass and bits of the other car (a mirror, a torn section of a fender, etc.) were cleaned up, my morning was pretty much gone.

If the taillight hadn't been destroyed, it'd be ready to drive anywhere.
My apologies for the diversion from Studebaker things but I figured most car people would be vaguely curious about the accident.

Sunday, March 11, 2012

One side down!

Since I was at the limit where I'd start to lose vacation time if I didn't take it and since the weather was supposed to be nice, I took Thursday and Friday off of work. My wife, who was in the same boat with her vacation time did the same.

Normally we'd take advantage of the nice weather and head over to the coast for some hiking (the skunk cabbage should be starting to bloom over there and, with all the wet weather we've had lately, the banana slugs should be out in force) but I'd given my plague-like cold to my wife and she spent the time in bed. So off to the garage for me.

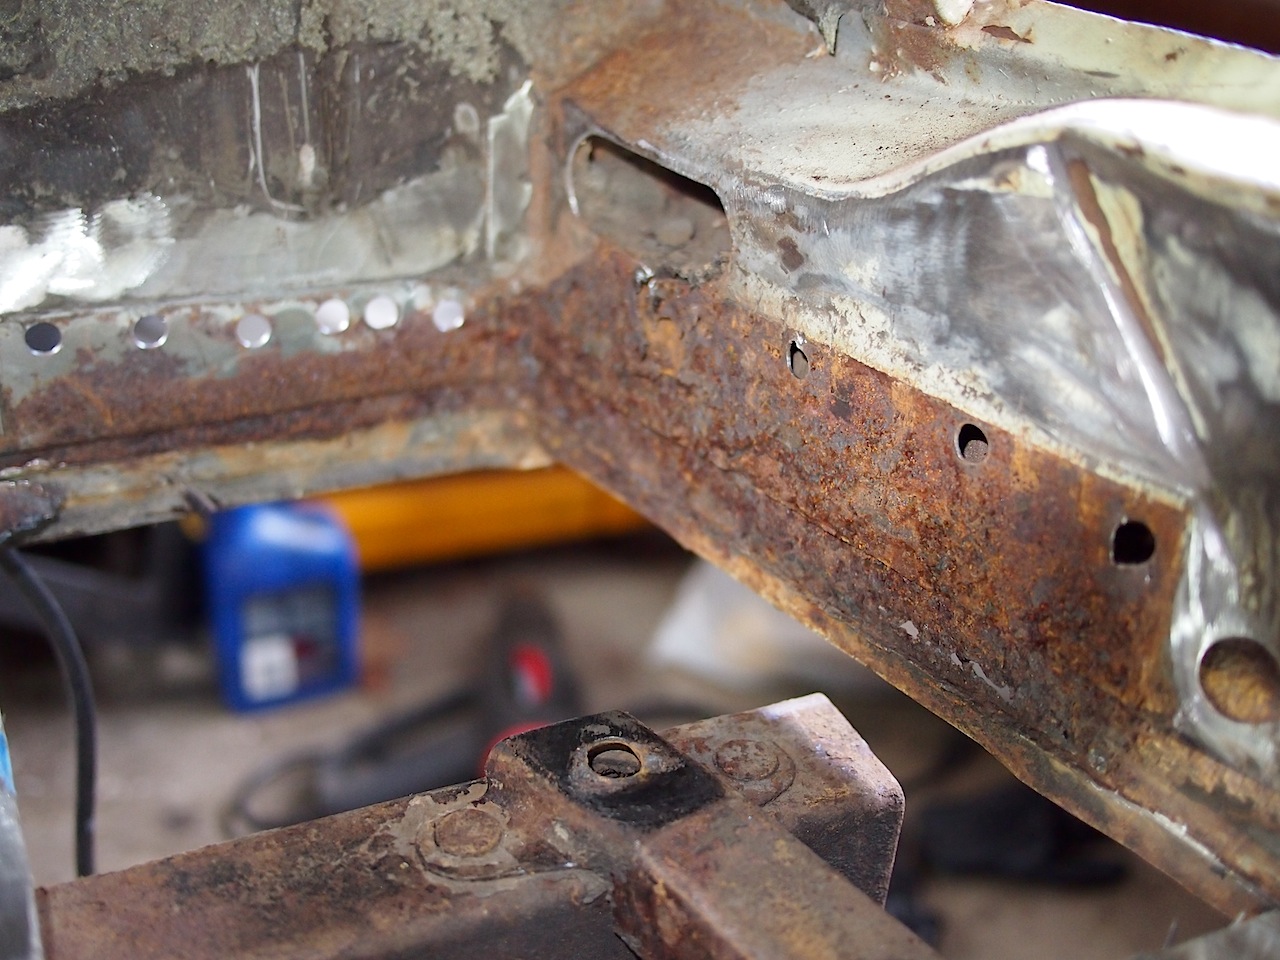
First thing, after spending a bit trying to get my patch to fit the opening cut out for it, I discovered there was more difference than I expected between the original floor pan stamping and this patch panel. So to make things easier, I cut the larger piece in half and, then, after a bit of bending and prodding, spot welded it into place.

patch 1 in place
Then it was simply a matter of lining up the 2nd half as best as I could and tacking it down.

 
not perfect (yet) but it fits
As you can see in the 2nd pic (if you click on it to blow it up to full size) there's an area that doesn't quite line up. So with a cutting wheel in my trusty dremel, I sliced that part out, removed a bit of the metal behind it, then slid the offending piece into the proper position. I added a few more welds between the rest of the spot welds and start filling. I also drilled holes in the metal on either side of the seam to assist in the creation of spot welds to the front body support directly beneath.

Now this didn't all go as smoothly as I described. One of the main differences between an inexpensive mig welder and a better model is the amount of time you can weld at a pass. So every so often my welder would simply shut down and I'd have to give it a break.  And as I said in an earlier blog post, I'm a little rusty at welding, so there'd be times I'd burn through the metal and would have to go back and carefully fill that in. Plus I did need to cut small bits out of scrap to fill in those holes where the old floor didn't quite match up with the new patch. But after several hours of work (over the course of 4 days--hey, I had other things to do, like take the dogs for a walk out in the foothills and sit in my recliner and play a few computer games--I was on vacation after all) I got it completed.

Done! (well, almost)
I still need to do a little clean-up underneath (the areas that burned through will need to be ground down on the underside of the car) but I'm going to move on to the other side--this one has been treated so it won't rust until I can get it sealed up with epoxy primer.

Oh, and in the lessons learned department, I leave you with this picture:

Note to self: move the creeper out from under the car when welding.

Sunday, March 4, 2012

shaping

No matter how well made a patch might be, I've never found one yet that didn't need some sort of adjustment. And so, after a week of fighting off a cold (it was determined that I didn't have the bubonic plague, like I'd suspected at times) I finally got a little time into the garage to work on the second patch.


The first step is to cut the larger piece down to a more manageable size, which I've shown in the above picture. Then it is simply a matter of fitting it to the opening. At this point, I'm still massaging it a bit before I cut it down and butt weld the repair panel into position.