
Monday, February 24, 2014
Saturday, February 22, 2014

GT Bucket Seat Test Fit
The way the bench seat fit, I was concerned that the GT Buckets might also interfere with the shifter. So nothing for it but to install them.
The buckets have a metal bracket that fits between them, in effect turning them into a bench seat assembly. That bracket is covered by a center console.
Yes, the seats fit, but the clearance to the shifter is very tight:

However, that should be easy to fix--I just need to move the mounting bolts back about an inch.

Now I just need to figure out a way to mount a boot at the base of the shifter. But that's a bit down the road.
The buckets have a metal bracket that fits between them, in effect turning them into a bench seat assembly. That bracket is covered by a center console.
 |
| They fit! |
Yes, the seats fit, but the clearance to the shifter is very tight:
However, that should be easy to fix--I just need to move the mounting bolts back about an inch.
Now I just need to figure out a way to mount a boot at the base of the shifter. But that's a bit down the road.
Sunday, February 16, 2014
Power Steering Hoses
It was too rainy to take the dogs out for a hike, so this afternoon I decided to put the power steering hoses on the car. The power steering hoses are a bit of a puzzle, but after enough trial and error I got everything to fit.
Here's the connections to the power ram. After carefully looking at the diagram, I realized I had my power ram upside down, but that was easy to fix. I'm at least 67% certain that I got them in the correct positions.

And here's the control valve, where the real fun took place:

Here's the connections to the power ram. After carefully looking at the diagram, I realized I had my power ram upside down, but that was easy to fix. I'm at least 67% certain that I got them in the correct positions.
And here's the control valve, where the real fun took place:
I'll need to stop by my storage unit to get the clamps that hold the hoses up in place; there's also a spring that holds two of the hoses up and back towards the firewall. I'm not sure I have that part in my stash so might have to see what I can come up with (or order some new parts.)
Heater Hoses
This morning, I tackled the heater hoses. Here's what I was up against:

I started with 26 feet of heater hose and a couple of boxes of clamps. . .

and started at the heater core.

Here's the completed project--one little hitch: the later model Studebaker V-8 used 3/4-inch heater hose outlets compared to earlier models which used only a 5/8th-inch hose. It was easy enough to fix with a couple sections of 3/4-inch hose and some adapters.

Once the fender is installed, I'll attach the hoses to it.
I started with 26 feet of heater hose and a couple of boxes of clamps. . .
and started at the heater core.
Here's the completed project--one little hitch: the later model Studebaker V-8 used 3/4-inch heater hose outlets compared to earlier models which used only a 5/8th-inch hose. It was easy enough to fix with a couple sections of 3/4-inch hose and some adapters.
Once the fender is installed, I'll attach the hoses to it.
Saturday, February 15, 2014
Glove box lid install
Just thought you might like to see a glimpse of what the dash will look like. Still needs slight adjustment, but my main goal was to get the glove box into place so it wouldn't get scratched up laying around. I think it is going to look pretty nice.

Ranco heater control valve reseal
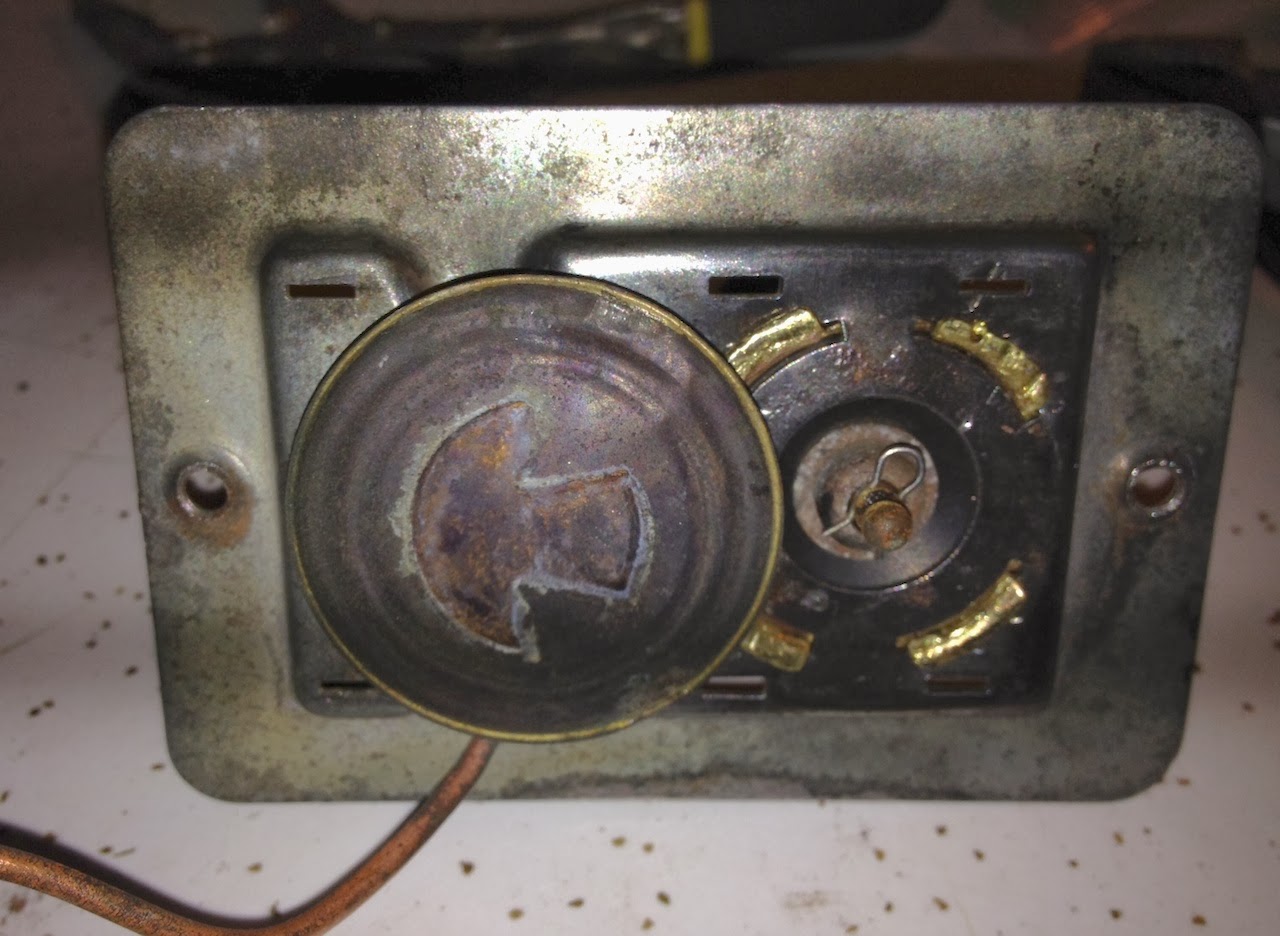
Continuing on towards the goal of getting the car to run under its own power, I need to button up the cooling system. Since Studebakers get interior heat from the cooling system, I have one last piece to repair before installing heater hoses: the heater control valve.
Here's what the beast looks like:

The valve works off a dash-mounted cable, which moves a plunger in and out of the tubes, blocking the flow of water to the heater and defroster cores. There's only one part to replace by this process--a rubber seal--but you have to take the thing apart to do it. Let's get started.
First, we remove the spring off the back:

Then the clip that holds the plunger against the controlling arm that moves it up and down.

After that, it is a matter of straightening out a series of tabs to separate the housing from the valve--here's the top section after it has been removed. The large, black disc on the right side is a rudimentary automated temperature control, which expands and contracts, adjusting the valve to regulate the temperature.
A few more tabs, and the diaphragm is removed:

Still more tabs to remove to get access to the valve.
Now that we have access, we can pull off the clip, the bell-shaped cover and the remains of the diaphragm, and remove the valve.
Then it was time for a thorough cleaning. A little more wire brush action, some emery cloth on the mating surfaces, and it was time for reassembly.
Here's the valve in place with the new diaphragm in place:

Then the temperature regulator is put in place...
Followed by the lower case, clip, and spring. Now I just need to find 2 number ten sheet metal screws to mount it to the firewall. Since this is all hidden by the dash and protected from the elements, I didn't bother to paint it--chances are I'll have to replace that valve again in a few years anyway.

Here's what the beast looks like:
The valve works off a dash-mounted cable, which moves a plunger in and out of the tubes, blocking the flow of water to the heater and defroster cores. There's only one part to replace by this process--a rubber seal--but you have to take the thing apart to do it. Let's get started.
First, we remove the spring off the back:
Then the clip that holds the plunger against the controlling arm that moves it up and down.
After that, it is a matter of straightening out a series of tabs to separate the housing from the valve--here's the top section after it has been removed. The large, black disc on the right side is a rudimentary automated temperature control, which expands and contracts, adjusting the valve to regulate the temperature.
 |
| The seal is on the left side--looks like it has leaked before. |
Still more tabs to remove to get access to the valve.
 |
| Looks a little better after a little touch up with a wire brush. |
 |
Here's the valve in place with the new diaphragm in place:
Then the temperature regulator is put in place...
Followed by the lower case, clip, and spring. Now I just need to find 2 number ten sheet metal screws to mount it to the firewall. Since this is all hidden by the dash and protected from the elements, I didn't bother to paint it--chances are I'll have to replace that valve again in a few years anyway.
Friday, February 14, 2014
Bits and pieces
I've done a bit more work on the Stude the last couple of days, but have been without Internet access at home so haven't posted any updates. Since I'll be without service for a couple more days, I thought I'd try doing a post using my phone. Here goes, fingers crossed!
First up, since I'm installing an electric cooling fan, the old one had to go. So some new, shorter bolts were fitted.
Next up, I put the pedal cover and steering wheel opening grommet in place:

And now for a bit of a surprise: The steering column, wheel and dash have come back from paint.
So now you know the color of my interior metal trim, and I have to be very careful working on the interior of the car from here on so I don't scratch anything.
First up, since I'm installing an electric cooling fan, the old one had to go. So some new, shorter bolts were fitted.
 |
| Amazing how filthy things can get just sitting there... |
And now for a bit of a surprise: The steering column, wheel and dash have come back from paint.
 |
| The wheel is not quite finished yet... |
Saturday, February 8, 2014
Climatizer
Today, I put the heater core and surround in the car.
First, out comes the front seat: on an old Studebaker, the heater, which is called a "climatizer," goes under the passenger side of the front seat. I then removed the cover plate since my car didn't come with heat originally.
Unfortunately, because of the batwing I installed earlier, I couldn't maneuver the surround into position with the front tube in place.

A quick trip over to the drill press to drill out a single spot weld, and the tube was off and the surround dropped into place.
 I was then able to slide the tube into place, and fix it with a small nut and bolt.

Now it is time to fit the heater core into place. First, I recreated some thick gaskets/padding material from some old dense foam exercise matting that was the right thickness.

Then the heater core drops into place.

Not wanting that pretty new heater core exposed like that, I went ahead and cleaned and painted the top cover--which not only protects the core but is designed to divert some of the heat over to the driver's side of the car. However, I must've not got it cleaned well enough--or it wasn't warm enough in the garage--as I got some fish-eyes in the paint. That's an easy fix later as it is only 3 bolts and I can leave the seat in position to do that. But here it is for now, and it is ready to finish up the rest of the cooling system.

First, out comes the front seat: on an old Studebaker, the heater, which is called a "climatizer," goes under the passenger side of the front seat. I then removed the cover plate since my car didn't come with heat originally.
Unfortunately, because of the batwing I installed earlier, I couldn't maneuver the surround into position with the front tube in place.
A quick trip over to the drill press to drill out a single spot weld, and the tube was off and the surround dropped into place.
Now it is time to fit the heater core into place. First, I recreated some thick gaskets/padding material from some old dense foam exercise matting that was the right thickness.
Then the heater core drops into place.
Not wanting that pretty new heater core exposed like that, I went ahead and cleaned and painted the top cover--which not only protects the core but is designed to divert some of the heat over to the driver's side of the car. However, I must've not got it cleaned well enough--or it wasn't warm enough in the garage--as I got some fish-eyes in the paint. That's an easy fix later as it is only 3 bolts and I can leave the seat in position to do that. But here it is for now, and it is ready to finish up the rest of the cooling system.
Friday, February 7, 2014
Fuel pump and line
With over a foot of snow in the last 24 hours, most of our little town (including where I work) was closed down. This, of course, gave me a chance to work on the Stude.
Although the metal fuel line on the Studebaker wasn't leaking, I didn't trust it. Hard telling what was lurking on the inside, and it had a slightly coppery sheen to it which isn't right for a fuel line. I had bought some replacement, so underneath the car I went to figure out where I wanted the bends in the line to go. I decided to start at the tank, and work my way to where I was going to mount the fuel pump on the frame.
Then it was time to install the pump. Electric pumps are better at pushing fuel than pulling it, so I found a location on the frame as close to the tank as possible at a low point on the frame. There was even a convenient hole already there.
The front part of the line was easier to route as there were very few bends. I put in a section of rubber hose near the front of the engine to allow for some flex, then routed hard line up behind the water pump to the fuel pressure regulator. Some additional sections of rubber hose, a fuel filter, and then connected it to the carb to complete the job.
Although the metal fuel line on the Studebaker wasn't leaking, I didn't trust it. Hard telling what was lurking on the inside, and it had a slightly coppery sheen to it which isn't right for a fuel line. I had bought some replacement, so underneath the car I went to figure out where I wanted the bends in the line to go. I decided to start at the tank, and work my way to where I was going to mount the fuel pump on the frame.
 |
| It is hard to make out the line, so I added a few arrows. |
 |
| Note the fuel filter between the pump and tank. Electric fuel pumps like clean fuel. |
 |
| I ran out of clamps but that's an easy fix. |
Sunday, February 2, 2014
Fuel tank
With the tank back, it is time to put in the fuel system. First off, the fuel tank.
I started with a little touch up paint, then after it dried, I installed the fuel gauge sending unit. Here's the tank all ready to go into the car (or so I thought at the time):
Then, after a bit of wrangling, I managed to bolt it into place:
Then, after about an hour struggling to get the rubber hose that connects the tank to the filler tube, I decided to take a break and read the manual. I know, who can't figure out how to bolt in something as simple as a gas tank, right?
The fuel filler assembly has to be installed before the tank is in place. Argh! So off comes the tank. However, I didn't have enough room underneath the car to maneuver it into place with the filler in the correct position, so had to loosen the clamp and rotate the filler tube 180-degrees to fit the tank into place. Of course, this required removing the left rear fender (only held on by 5 bolts at this point, so an easy task.) Then, once in position, I turned the filler up into place and tightened up the clamp.

Well that took a bit longer than expected, but I'm glad it is done. Off to watch the super bowl!
I started with a little touch up paint, then after it dried, I installed the fuel gauge sending unit. Here's the tank all ready to go into the car (or so I thought at the time):
 | |
| My camera's flash does not agree with the tank. It appears satin black in person | . |
 | |
| What is with the weird reflections! |
The fuel filler assembly has to be installed before the tank is in place. Argh! So off comes the tank. However, I didn't have enough room underneath the car to maneuver it into place with the filler in the correct position, so had to loosen the clamp and rotate the filler tube 180-degrees to fit the tank into place. Of course, this required removing the left rear fender (only held on by 5 bolts at this point, so an easy task.) Then, once in position, I turned the filler up into place and tightened up the clamp.
Well that took a bit longer than expected, but I'm glad it is done. Off to watch the super bowl!
Subscribe to:
Posts (Atom)