
Wednesday, January 29, 2014


Monday, January 27, 2014
Defroster
Today I tackled the defroster.
After disassembly, cleaning and a quick coat of paint, I started by fitting the new motor (NAPA part #655-1020) to the base frame.

There are two paper gaskets that surround the defroster coils--these were toast, so I made new ones from a box.

I then assembled the fan shroud and coil assembly.

After securing the fan to the motor shaft with a set screw, the motor assembly was then bolted into the car.

And then the fan shroud assembly was bolted into place.

Job done for now.
After disassembly, cleaning and a quick coat of paint, I started by fitting the new motor (NAPA part #655-1020) to the base frame.
There are two paper gaskets that surround the defroster coils--these were toast, so I made new ones from a box.
I then assembled the fan shroud and coil assembly.
After securing the fan to the motor shaft with a set screw, the motor assembly was then bolted into the car.
Job done for now.
Friday, January 24, 2014
More errands
This morning I went to a "Pick-N-Pull" salvage yard and grabbed the drive shaft out of a mid-90's Mustang with a T5. I only needed the slip yoke (the very front piece of the shaft--the piece that slides into the back of the transmission) but had to buy the whole thing. And, since it was a "Pick-N-Pull," I had to remove it myself--so a few minutes underneath a car sitting on a stack of old wheels on crushed gravel struggling with rusty nuts and bolts and I was rewarded with a 5-foot long metal tube. After a quick trip back to the garage to make sure the yoke fit (it did,) I got things measured up.
The drive shaft on this Studebaker is a two-piece affair. There's a bearing in the center, with a surrounding metal framework that is bolted to a cross member of the frame. This cross member has a hole in the middle through which the drive shaft passes. Since the new transmission is longer than my old one I need to shorten the drive shaft, but since the distance from the cross member to the differential at the rear of the car is the same as before, I only need to get the front section shortened. To do this, I removed the yoke from the Mustang drive shaft and pushed it all the way into the back of the transmission. I then pulled it out 1" to allow for a bit of movement. Then, measuring from the center line of where a u-joint will connect the slip yoke to the drive shaft to the back of the cross member, I determined that the front drive shaft will need to be 6.5-inches long.
It was off to Salem to the closest drive line shop to have the front shaft shortened, and, while they're in there, to go ahead and replace all the u-joints and the center bearing. Should be just like new when they're done.
On the way back, I stopped by the radiator repair shop to check on the gas tank and the heater core. The "core" of the heater core, which needed to be replaced, was shipped today and should arrive on Monday--so that should get finished by mid-week, and the gas tank will be done soon after.
Won't be long until the car will move under its own power now.
The drive shaft on this Studebaker is a two-piece affair. There's a bearing in the center, with a surrounding metal framework that is bolted to a cross member of the frame. This cross member has a hole in the middle through which the drive shaft passes. Since the new transmission is longer than my old one I need to shorten the drive shaft, but since the distance from the cross member to the differential at the rear of the car is the same as before, I only need to get the front section shortened. To do this, I removed the yoke from the Mustang drive shaft and pushed it all the way into the back of the transmission. I then pulled it out 1" to allow for a bit of movement. Then, measuring from the center line of where a u-joint will connect the slip yoke to the drive shaft to the back of the cross member, I determined that the front drive shaft will need to be 6.5-inches long.
It was off to Salem to the closest drive line shop to have the front shaft shortened, and, while they're in there, to go ahead and replace all the u-joints and the center bearing. Should be just like new when they're done.
On the way back, I stopped by the radiator repair shop to check on the gas tank and the heater core. The "core" of the heater core, which needed to be replaced, was shipped today and should arrive on Monday--so that should get finished by mid-week, and the gas tank will be done soon after.
Won't be long until the car will move under its own power now.
Monday, January 20, 2014
Radiator test fit
After bad news from the radiator shop about my two original Studebaker V8 radiators (they were beyond repair) I was left with another decision: I could have a custom radiator built to the original size which would be very expensive, I could try to find another 60 year old radiator and hope that it would be in good enough shape to re-core, or I could adapt a generic radiator to fit.
Since one of our local Studebaker Drivers Club members went the expensive custom radiator route and it still didn't quite fit, and since my car isn't going to be an original restoration (we're well beyond that,) and since I'm beginning to doubt my luck at finding an old rebuildable radiator, I decided to go the "adapt a generic one to fit" route.
Several Studebaker restomod and hot rod builders have found the low profile 16" x 26" GM-style aluminum radiator from Northern to be a close fit. And at under $200 shipped, it seems like a potential bargain. So I ordered one and it arrived this weekend.
The radiator is slightly wider and thicker, and a little shorter, than the original radiator; it is also a cross flow design which is more efficient. So some adapting is required to fit the frame. A cut-off wheel on my grinder made quick work of removing 3/8th-inch from the inside edge of the frame:
Then I installed the radiator frame, using the same amount of spacers (7 washers) that I found in place when I disassembled the car, and slide the new radiator into place.
My main concern, clearance of the bell-crank arm (a part of the steering system) was unfounded--it is close (less than 1/2-inch I'd say) but it does clear throughout a complete lock-to-lock. This said, it is tight enough that I will probably go with an electric fan in front of the radiator instead of trying to build a shroud that would fit the new radiator and still have enough clearance for the steering.
That doesn't mean that there aren't any problems: one concern is the lower water outlet of the radiator. It seems to be pointing straight at the cross-member and I'm not sure I can get a hose to make that big of a turn without cutting off the water flow. I may need to have that cut and welded back on at a different angle; even with that added expense, I'm still dollars ahead of a custom replacement.
Since one of our local Studebaker Drivers Club members went the expensive custom radiator route and it still didn't quite fit, and since my car isn't going to be an original restoration (we're well beyond that,) and since I'm beginning to doubt my luck at finding an old rebuildable radiator, I decided to go the "adapt a generic one to fit" route.
Several Studebaker restomod and hot rod builders have found the low profile 16" x 26" GM-style aluminum radiator from Northern to be a close fit. And at under $200 shipped, it seems like a potential bargain. So I ordered one and it arrived this weekend.
The radiator is slightly wider and thicker, and a little shorter, than the original radiator; it is also a cross flow design which is more efficient. So some adapting is required to fit the frame. A cut-off wheel on my grinder made quick work of removing 3/8th-inch from the inside edge of the frame:
 | |
| This cleaned up nicely with a file and a couple of passes with the flap wheel on the grinder. |
 |
| Starting to look more car-like everyday. |
That doesn't mean that there aren't any problems: one concern is the lower water outlet of the radiator. It seems to be pointing straight at the cross-member and I'm not sure I can get a hose to make that big of a turn without cutting off the water flow. I may need to have that cut and welded back on at a different angle; even with that added expense, I'm still dollars ahead of a custom replacement.
 |
| It might work...going to be close! |
Sunday, January 19, 2014
A few odds and ends
I'm actually getting close to firing up the engine--and so it needs a few basic bits. This weekend, I added oil and oil filter, belts, spark plugs, coil, and spark plug wires. Doesn't seem like much, but it is starting to look a bit more complete.
 | |
| Filling the crankcase is twice as fast with two inlets. I'm using Valvoline Racing Oil since it includes old levels of an additive, ZDDP, which is greatly reduced in oil for newer engines. |
 | |
| The coil is made by Mallory, and is a good match to the Mallory Unilite Ignition. I also added a filter (not shown) to protect the internal workings of the distributor. |
 |
| A little messy (I have to order some alignment clips for the wires) but they are now cut to length and installed. Fresh plugs were gapped to .035". Still need to figure out what I'm going to do for an air cleaner. |
Sunday, January 12, 2014
Building a steering column
Awhile back, I bought the steering wheel from an Avanti. For those who aren't familiar with Studebakers, the Avanti was a fiberglassed-body car made as a last ditch effort to save Studebaker from their inevitable swan song.
The Avanti has a very particular style--I've found that people have strong reactions to them: either you love them or you hate them. I'll let you decide:

Personally, I didn't like the Avanti, at least not the whole thing, until I saw one in person. They're hard to capture in a picture, I guess. But I did really like a couple of things about them: the front end treatment is very futuristic, which I like, and the interior treatment is my favorite of all of the Studebakers. Plus they were offered with a couple of supercharger options!
So, after quite a bit of trial and error involving multiple steering boxes and columns, I decided that, given my move to a newer steering box and the difficulty of adapting my existing steering wheel to the new setup while retaining all of the functionality (the horn, namely,) and because I didn't feel the styling of the GT Hawk wheel was a good match to my existing dash, I decided to use an Avanti steering wheel.
Because the Avanti uses a different mounting mechanism for the column and the steering shaft, it did involve a bit of modification.
Here the steering column is put in position for measurement--note that it does not extend over the top of the steering box; this is needed to hold the steering column in position.

So after measuring twice, I cut the end off of the GT Hawk Column that mates up to the top of the steering box.
Welded in place with a series of spot welds:

After a brief clean up with a file, here it is in position (there's a clamp that fits over this to lock it in place):

And here it is bolted into position:
Now I just need to pull it back out and clean everything up and get it ready to paint. At least I was able to sit in the car and make zroom-zroom noises and have the steering wheel actually turn the front wheels.
The Avanti has a very particular style--I've found that people have strong reactions to them: either you love them or you hate them. I'll let you decide:
Personally, I didn't like the Avanti, at least not the whole thing, until I saw one in person. They're hard to capture in a picture, I guess. But I did really like a couple of things about them: the front end treatment is very futuristic, which I like, and the interior treatment is my favorite of all of the Studebakers. Plus they were offered with a couple of supercharger options!
So, after quite a bit of trial and error involving multiple steering boxes and columns, I decided that, given my move to a newer steering box and the difficulty of adapting my existing steering wheel to the new setup while retaining all of the functionality (the horn, namely,) and because I didn't feel the styling of the GT Hawk wheel was a good match to my existing dash, I decided to use an Avanti steering wheel.
Because the Avanti uses a different mounting mechanism for the column and the steering shaft, it did involve a bit of modification.
Here the steering column is put in position for measurement--note that it does not extend over the top of the steering box; this is needed to hold the steering column in position.
So after measuring twice, I cut the end off of the GT Hawk Column that mates up to the top of the steering box.
 |
| All cleaned up and ready to weld |
After a brief clean up with a file, here it is in position (there's a clamp that fits over this to lock it in place):
And here it is bolted into position:
 |
| No worries, everything will be painted up to match the dash color |
Wednesday, January 1, 2014
Dropping off stuff, ordering stuff...
Not much to show, but I haven't been idle this week. I dropped the gas tank, both of the 3-core radiators I've managed to collect, and both heater cores (in a Studebaker, the defroster is a separate core) at the radiator shop yesterday for testing, cleaning, and any necessary repairs. And today, I ordered the parts to complete the ignition system: an ignition coil, some fancy spark plug wires (recommended by the manufacturer of the aftermarket distributor) a ballast resistor, and an active power filter which, hopefully, will prevent a voltage spike from zapping the fancy ignition module inside that distributor.
And I ordered a new floor jack to replace the 10-year old one that had been leaking the last 2 years and finally got stuck in the "up" position.
I also bought a quart can of truck bed liner a few days ago, but I haven't done anything with it. Originally, I had planned to put on a tyvek suit and gloves and crawl under the car and roll on the bed liner on as a tough undercoating, but after thinking some more, I'm not sure I wouldn't be better off having it sprayed on--I think the coverage would be much better in those little nooks and crannies, and more even overall, if I paid someone to spray it on. Something to ponder for a bit.
And I ordered a new floor jack to replace the 10-year old one that had been leaking the last 2 years and finally got stuck in the "up" position.
I also bought a quart can of truck bed liner a few days ago, but I haven't done anything with it. Originally, I had planned to put on a tyvek suit and gloves and crawl under the car and roll on the bed liner on as a tough undercoating, but after thinking some more, I'm not sure I wouldn't be better off having it sprayed on--I think the coverage would be much better in those little nooks and crannies, and more even overall, if I paid someone to spray it on. Something to ponder for a bit.
Wednesday, December 25, 2013
Converting gauge cluster to 12-volt
First, let me start this post by letting everyone know that I actually own two gauge clusters for the Studebaker, and that through this process I will be combining parts from both as I do this conversion; it is not my intention to confuse anyone, although if you'd like to turn this into a game of spotting the differences between the pictures, feel free.
Ok, with the official disclaimer out of the way, let's launch into the project.
I've done two things to the Studebaker resulting in a major impact on the gauges: first, I've put a different engine in it, which has different sensor output than the gauges are used to receiving, and second, I've switched it from 6-volt positive ground to 12-volt negative ground (the modern standard for the majority of automobiles.) While it would be possible to hook the gauges up to a twelve-volt signal using a step-down converter such as a Runtz capacitor, I would still not be sure how accurately they would read with the signal from the V8's sensors. Fortunately, there's a relatively painless solution: the individual gauges from a 63-66 Studebaker Lark will fit with minor modification and are a match to the sensors on the new engine.
Here's the gauge cluster at the start:


.JPG)
.JPG)
Ok, with the official disclaimer out of the way, let's launch into the project.
I've done two things to the Studebaker resulting in a major impact on the gauges: first, I've put a different engine in it, which has different sensor output than the gauges are used to receiving, and second, I've switched it from 6-volt positive ground to 12-volt negative ground (the modern standard for the majority of automobiles.) While it would be possible to hook the gauges up to a twelve-volt signal using a step-down converter such as a Runtz capacitor, I would still not be sure how accurately they would read with the signal from the V8's sensors. Fortunately, there's a relatively painless solution: the individual gauges from a 63-66 Studebaker Lark will fit with minor modification and are a match to the sensors on the new engine.
Here's the gauge cluster at the start:

The piece that contains the gauges detaches from the rest of the assembly by removing 6 screws:

Next, the old brittle wires were removed by pulling the bulb housings and removing the nuts from the back of the gauges.

The gauges are now easily removed.

Of course, I wanted to see if the new gauges really fit, so I tossed the temperature gauge in place. Then it was cleaning time.

The light, robin-egg blue color supposedly reflects a softer light across the gauges. It cleaned up nicely--no need to repaint. Time to trim the two lower gauges (the others were just fine) and then throw everything in place.
.JPG)
Hmm, should I paint the speedometer needle orange, or the other needles white? Although that would be less work, I'm not sure how well that would go with the gold trim. Time for more cleaning. . .light soap and water for the glass bits, and a bit of microfiber and wax for the metal parts, with a light coating and buffing over the glass as well.
.JPG) | |
| Oops! |
Complete--for now. I need put the lights in place (they simply snap into holes in the back) but want to see if I can source new replacements for those. And there needs to be a bit more cleaning around the switches, but that will wait for another day.
.JPG)
Saturday, December 21, 2013
Not so fast, Houston
Sometimes I act before fully thinking through a problem. Not very often, thankfully, but it does happen occasionally.
I figured out that the steering box has room for a tiny bit of adjustment, and, after loosening the three bolts that hold it to the frame discovered that small movement at the fulcrum made a difference of several inches at the end of that lever. Here it is, in the proper position:

So where exactly does the act come in to play here? Well, I bought an Avanti steering column to match the Avanti steering wheel that I obtained a few months ago and it is being shipped here now. So, if nothing else, I'll have a couple of options. There's still a bit of work to get my old steering wheel to match up to the new column (for instance, the steering shaft diamater is smaller than the original) but at least it the wheel won't be resting on my legs when I'm driving.
I also got the parts I needed to install the rear shocks today. Of course, nothing could just be a bolt in--the lower mount that came with the shocks was a slightly larger diameter than the hole in the spring plate.
After drilling the plate to the right diameter, everything just slid together nicely.

Getting closer!
I figured out that the steering box has room for a tiny bit of adjustment, and, after loosening the three bolts that hold it to the frame discovered that small movement at the fulcrum made a difference of several inches at the end of that lever. Here it is, in the proper position:

I also got the parts I needed to install the rear shocks today. Of course, nothing could just be a bolt in--the lower mount that came with the shocks was a slightly larger diameter than the hole in the spring plate.
 |
| That shock mount is really thick! |

Getting closer!
Monday, December 9, 2013
Houston, we have a problem!
It was too cold to do too much work this weekend in my unheated garage (my little space heater just couldn't keep up with temps in the single digits) but there were a few things I could do that wouldn't take much time and I could still feel like I accomplished something.
One of those things was to install the old bench seat in the car to make it easier for my assistant to depress the brake pedal when we bleed the brakes in the near future. The frame barely fit behind the shifter, but with a little wriggling I managed to get everything bolted down. Unfortunately, it was then that I discovered the steering column seemed unusually close to the top of my thighs.
Time to put the dash in place to see if I'm just imaging things.

That's a good 2 to 3 inches below where it should be.
Apparently, the mounting bracket on the GT Hawk steering box, which bolted right up to the frame, is clocked slightly different from the earlier box that came in my champion.
This leaves me with a few options:
One of those things was to install the old bench seat in the car to make it easier for my assistant to depress the brake pedal when we bleed the brakes in the near future. The frame barely fit behind the shifter, but with a little wriggling I managed to get everything bolted down. Unfortunately, it was then that I discovered the steering column seemed unusually close to the top of my thighs.
Time to put the dash in place to see if I'm just imaging things.
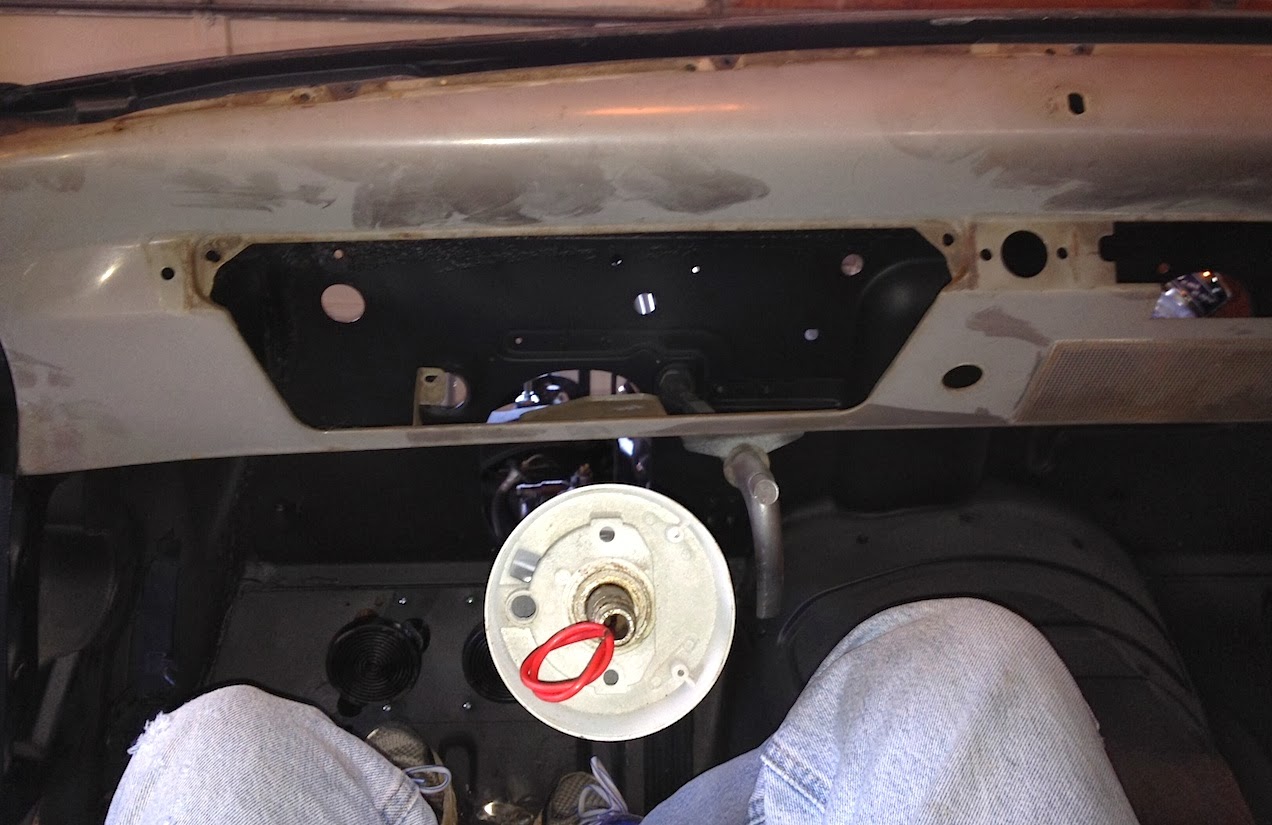
That's a good 2 to 3 inches below where it should be.
Apparently, the mounting bracket on the GT Hawk steering box, which bolted right up to the frame, is clocked slightly different from the earlier box that came in my champion.
This leaves me with a few options:
- I could go back to my original manual steering box and column. The ratio is the same as the existing box, but would require a modified pitman arm.
- I could make adjustments to the frame to change the angle of the column. While this seems the easiest option, the fear here would be that this would weaken the frame. The mounting bracket on the box itself is integral, and is cast in such a way that it is not conducive to the necessary modifications.
- I could modify the GT column, shortening the shaft and the column, terminating it at the firewall and adding a couple of u-joints in the shaft to join it to the steering box. This would require an addition of a plate and mounting bracket to hold the column in place at the firewall.
- I could buy an aftermarket steering column and, as above, terminate it at the firewall. This would save time while adding the advantage of plug and play wiring for the turn signal switch. However, it would likely result in the inability to use an original Studebaker steering wheel--something I would prefer to retain.
Subscribe to:
Posts (Atom)